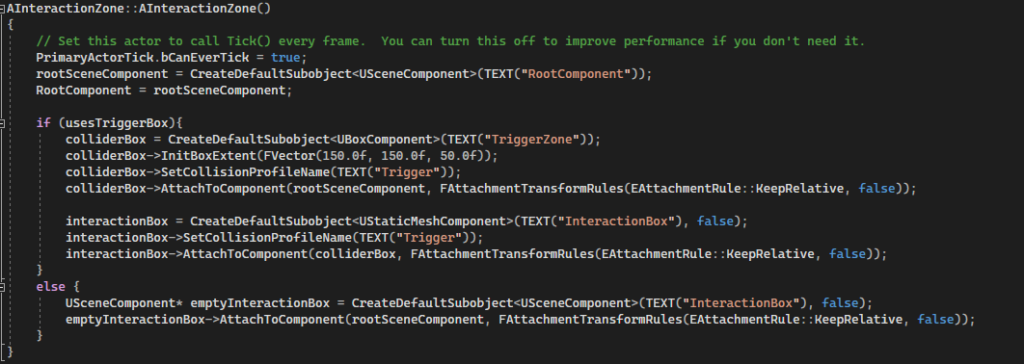
I had a sliding bookshelf class waiting to be used for the game so I will use that to create a puzzle level for the project however the class has some shortcomings that I have since learnt from and know how to deal with such as the collision box being the root component so if you want to change its location you have to move the entire blueprint
In the new system I have changed the heigharchy of the components so that the collision box is no longer the root component, this means that you can move the collision box instead of having to move everything around it
In the new version there is a seperate object that is made to be the root, along with that the 2 parts of the collision box, the visible and the functional, are now attached correctly so if you move the functional part the visible part moves with it
I have changed the way that the sliding block system checks which point (Start or End) its closest too, because it only checks once the movement is completed I only need to see if its closer to one than it is to the other, as well it seems my previous implementation was nonsensical as it runs an if statement with opposite checks to the ones needed to get to the if itself. Instead it will now run the if once the timer, that the object moves according to, ends
It now just changes the atStartPoint variable once the timer has run out as the object should always have made it to the other side by that point as the timer is used to calculate its position
I’m going to change the way that the sliding block handles interaction, currently it has a variable called object to move which is a single object however for the puzzle that I want to make I will change it so that it has an array of objects which will give me the ability to have each interaction zone affect as many sliding blocks as I want
This overhaul has caused a problem to arise involving my system to check if the object is at the start or end point, I should be able to exchange this previous system with just having the bool swap on timer end
Suddenly realised during this process that the way that I have gone about changing this will not work as it only supports one start and end point, I will need something external to handle all of the different start and end points, I will instead make something that will manage the sliding blocks (calling blocks from now on) and give the blocks a bool which dictates if it will be handled by something else (removing its collider) or not
It turnt out that I already had a really good system for handling this, This is a seperate class that has an array of sliding blocks that you can assign in the editor so you can choose how many different sliding blocks you want to be moved by one manager allowing many more options for layout
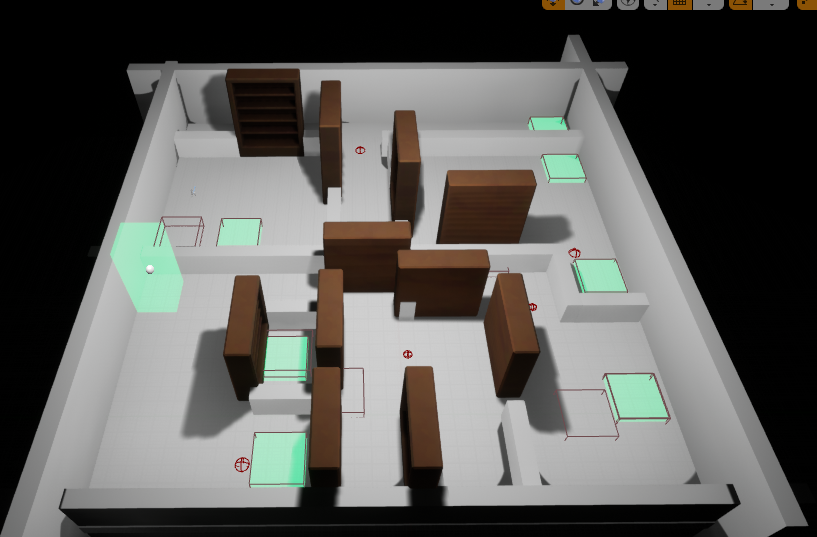
When it came to designing the room, I split it into two halves and for each door I’d give it a purpose before I placed it (first door is there to teach about buttons) top door is there to teach about single bookshelf buttons + hiding buttons, right door blocks a single and is a path to the final first half button (behind another shelf) etc, I do not believe there is a wasted door that the player will not have to think about
This is the overview of the map, it has lots of different buttons to press which are connected to different and sometimes multiple shelves
When I got to the second half of the room, to spice it up a little I added shelfs that would permenently move so that the player has to time their passes through
I have been tasked with completing the work that I had failed to finish during term 2. This includes;
The hypercasual game, the 3000 word essay, 4 of the CPP UE4 tasks, the personal planning folder,
a dev diary and the reflective learning summary, I also need to create a level for the collaborative
game made during the third term
I plan to create an endless runner with 3 lanes and obstacles that force the player to jump or crouch, in the style of Temple run 2 (reference) or Subway surfers (reference), The inputs will be sliding which I will handle by taking where they start the motion and then getting the direction to perform one of four actions moving left, moving right, jumping or crouching
17/07/22:
note version: UE4 default scene root causing issues in character blueprint, not being overriden by my own root component, fixed by remaking the player blueprint.
Installed Android studio and the UE4 Android SDK stuff to be able to test it on my phone.
UE4’s Android setup bat wasnt working due to an incorrect (presumably older) folder path, once fixed worked fine
Touch inputs set up, didnt define a function correctly leading to an error when constructing it, missed the “AMyClass::” before the function name
To create a sliding input system I will take the location that the player starts their touch and compare it to where they end their touch, using this to understand if they want to jump, duck or move left and right
PYTHAGORUS ADDING VECTOR A’s sq(X^2 + Y^2) THEN COMPARING TO VECTOR B’s sq(X^2 + Y^2)
New plan: minus vector A and B X’s and Y’s, use that to make new vector and see if the hypotenuse of that is helpful
UP EXAMPLE: (.5, .5) – (.6, .2) -> (-.1, .3)
Newer plan, subtracted the two vectors from each other and then do two seperate comparisons, one for positive increase (gets the bigger positive for downward or right swipes) and one for negative increases (for up or left swipes)
RIGHT EXAMPLE (.5, .5) – (.8, .4) -> (-.3, .1)
going to create four if statements one for each direction, it’ll check that the x / y is greater / less than a target number (0.1)
First we’ll check to see if X and or Y is positive so that we can do more accurate checks if (X > 0) //Positive (Left) keep track of with bool xPositive else //Negative (Right) if (Y > 0) //Positive (Up) else //Negative (Down)
Added a preliminary check to make sure that neither value is within the dead zone (if either x or y is less than 0.1 and greater than -0.1 then we can skip checking) otherwise we can just check if they’re negative and if they are times them by negative 1 to make them positive and then compare that, add something that keeps track of if it was originally negative so we know direction and it should work
Moving down needs to both scale and move the player, an if statement handles slowly moving the player up the 25 units we move it down by so i should be able to use how much its moving / how much it needs to move in order to know what scale it needs to be at from 0.5 to 1 so thats a ratio between 0.5 and 25 (0.02 in scale for each unit) so we’ll get the position per tick (the position will only be between 25 and 50 unless they move up which I’ll have a reset for) and times it by 0.02 to get what scale we should be at
This handles the touch input and saves where the player started touching and stopped touching for use later, it then shrinks the touch inputs to the actual viewport / screen size before getting the final float values which are the starting and end points subtractedThis first checks to see if either x or y from the previous step are negative and if they are they’re made positive but it is saved that they started out negative, the x and y is compared to see which is longer (and therefore the intended direction) before a last check to see if the longer value was originally negative. The outcome of this gives us one of four directions, Up Down Left or Right. The next section handles whichever one it was, if left or right then it checks that the player isnt too far left or right and then moves them by a set amount and increases the value that keeps track of them (its a 0 – 2 int which represents the 3 possible locations). For the up the cube is raised into the air and then an if statement brings it down at a fixed speed. For the down the cubes scale is reduced to half and the position is lowered, the scale is then risen proportionally with the position
28/07/22
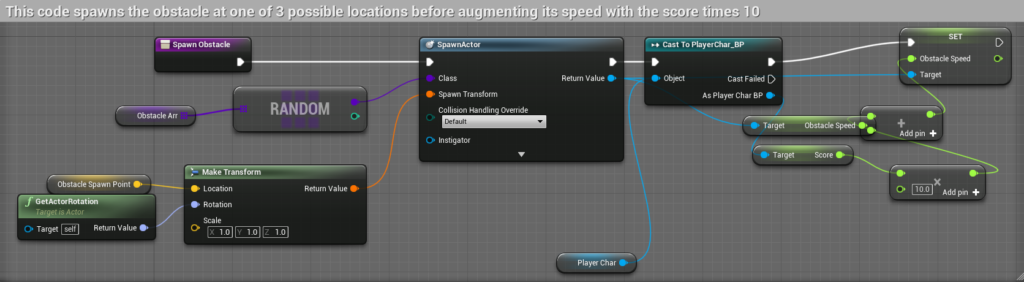
Creating an object spawner: trying to have an array of objects which will be randomly chosen from when an obstacle needs to be spawned, however the spawnactor function requires a class as the input and I do not know the class, I have a few options on how to deal with this, I can either create many different spawnactor calls behind a switch statement and check which is wanted or I can try to figure out how to use the array with the spawnactor call so that I only need one. I went for the latter as I want this to be scale-able even for a short project as I do not know how many obstacles I will make
After being unsuccessful in my attempts to spawn objects using the SpawnActor function I will instead create a blueprint of my C++ class and use the function in that as I have seen examples where this had worked
I moved most of my code over to blueprint but I kept a function to choose a spawn point for the obstacle at random as I do not know how to do this in Blueprint
I have added a second random range function to the timer as I want the obstacle spawning to feel random so the time needed can be half or double of the normal spawn timer
I’m going to use the gamemodebase c++ class in order to make a score counter that’ll increase with time, I hope to also use this score counter to either decrease the time between obstacle spawns or increase the speed of the obstacles, or both.
I have instead used the player class and kept the score in there as it doesnt change anything keeping it outside of the player class along with using the score to decrease the time before spawns and increase the speed of the obstacles
14/03/22: This week we were set into groups to create a game jam style game prototype in around a week which we would then be expanding upon for around six weeks, this game needs to fit the theme “a conversation that changes the world” our game through the conception stage became a game about two stoners that try to remember the day before and how it ended in the apocalypse, the hazy memory of the stoners is used to drastically change the narrative based on the players choice. The game was inspired by Kindergarten (SmashGames, 2017) and House (Bark Bark Games, 2020). The project is a 2D isometric pick your path down a narrative puzzle game.
21/03/22: During the meeting to discuss game progress between the teams our group was told that the characters could not be stoners directly due to problems with target demographics. We started working on the game project itself, I created a pickup base class which worked by calling a function whenever the player pressed space that would add itself to an inventory that the player has so that they can cycle through the items they have, this should work well with puzzles that have the player take items that they find previously and use them to fit certain conditions to progress
28/03/22: On top of having a group project to be giving attention to we have also been tasked with writing a Report proposal for a report that we will do in the third year. We choose a topic to delve further into such as AI or VR. I’m curious about doing something such as making my own engine though that would be too big a task for the short time we’re given to accomplish it. I will do research on OpenGL which is a rendering API (Application Programming Interface) (Basically a library) that I can use to create a basic renderer. OpenGL has been used in many games as an alternative way to render, usually for compatibility as it works with more computers than DirectX (linux doesnt support DirectX directly)
04/04/22: After giving the project more thought and doing some research on OpenGL I have decided to create a simple renderer for my task, currently I do not have a more specific goal than to follow some sources to create a renderer though i do not yet know what I will use it for. My primary source of information in setting up the renderer will be from: https://learnopengl.com/ which is a large tutorial, written in C++, that explains how OpenGL and rendering works. I will be coding the program in C as it is a language I would like to learn as well as being the language used to create OpenGL. It’s used as the base for C++ so it shares a lot in common, the biggest difference being that a lot of functionality introduced in C++ (classes is an example) isn’t present in C so if the tutorial uses anything like that I will have to find a way around it
During this week I also redeveloped the interaction system for the group project as the current version was unusable in C++ and I don’t know blueprint well enough to contribute with it, so I replicated the way the original interaction system worked (calling to whatever object you were standing in the trigger for). This system was indistinguishable but meant that I could create interaction objects in C++ in the future. One bug that I took a bit to fix was that the trigger’s visual effect wouldnt be attached to the trigger object but changing the object from static to movable had seemingly fixed it
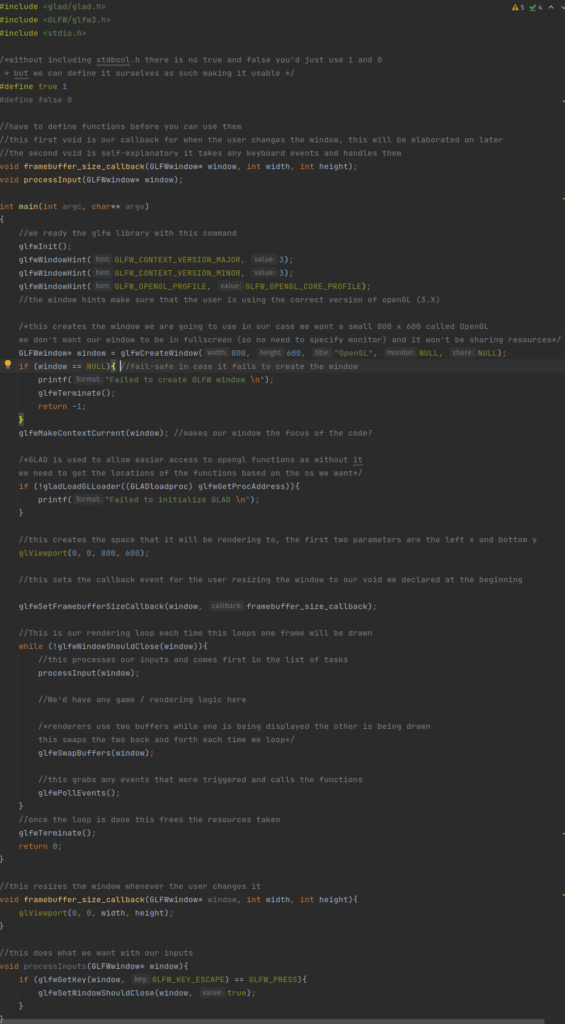
11/04/22: I went about setting up a way to follow along with sources and get started on creating a renderer in C, I decided to use CLion (JetBrains, 2015) as we have a student license for it however when downloading it I made a big mistake, I use Linux as my operating system which comes with an appstore of sorts which has CLion available to download but what I didn’t realise until later is that the download is in the form of a flatpak which is a way of packaging applications but flatpak keeps the application inside of its own environment. This is great for security but not for an IDE (Integrated Development Environment) which needs access to the root filesystem to get libraries to compile with, It took me a long time to realise this was the case but I kept getting errors about the compiler being unable to find the libraries that are supposed to be included with my operating system. Once I knew that this was the issue I instead downloaded it from the site which worked much better as I could now compile the code I was using to test the OpenGL setup I had:
creates a window called hello world that renders a right angle triangle on screen, I used it to make sure my CMake file was set up correctly. a CMake is used as instructions for the compiler so for example it contains all of the names and paths to the files needed for the build such as library files or header files
18/04/22: Following a tutorial found here: https://antongerdelan.net/opengl/ I sought out to set up OpenGL and use it for my technical report. I used CLion for this project
I’ve run into issues with libraries and I’ve needed to find them in my operating systems files (Linux Pop OS)
Needs to find out more about library links and the CMake file
Taking the example code shown in Functional Example found at: http://www.codebind.com/linux-tutorials/install-opengl-ubuntu-linux/. I was able to get a triangle to appear on screen, tweaking the x y z allowed me to manipulate the triangle, the x y z lines generate the shape by placing vertexes onto the screen which opengl then connects together, these vertexes are read counter clockwise so its important to keep that in mind when creating vertexes
Main Takeaway – C is very barebones even booleans arent included by default. Libraries give enormous amounts of functionality like opengl trivialising large tasks such as creating a window or polling for keyboard inputs
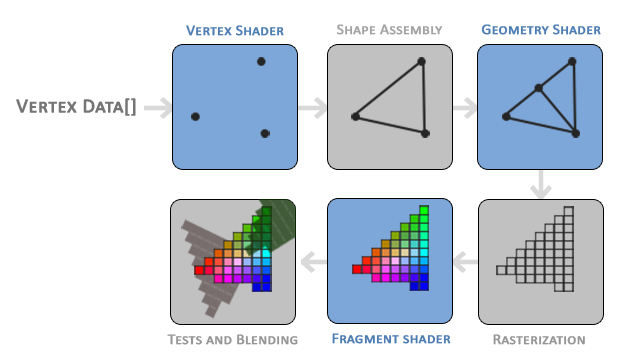
25/04/22: In order to render a triangle I will need to understand how rendering is done through opengl, though this does apply to rendering in general. The first stage takes all of the vertices from the vertex data which gives a list of three 3D coordinates that form a triangle. The next stage takes the vertices and turns them into primitive shapes (the shapes need to be specified through hints given to the vertices). Once the primitive assembly is done its output is given to the geometry shader which generates the more complex shapes from the primitives by adding new vertices. Afterwards its moved into rasterization stage where the shapes are mapped to the pixels on the screen turning them into fragments for the next stage, before it reaches that however it removes any fragments that arent visible. The fragment shader calculates the final colours of the pixels usually the effects are applied in this stage as the fragment shader can contain the lighting and shadow data. There is a final stage that checks depth and alpha values in order to blend objects together if needs be. In OpenGL we have to create a vertex and fragment shader as there isnt a default one on the GPU so I’ll have to learn more about rendering to do even seemingly simple things like rendering triangles
Rendering has many stages to it from the points of the shapes to the colouring and blending of points
Taken from https://learnopengl.com/Getting-started/Hello-Triangle
02/05/22:
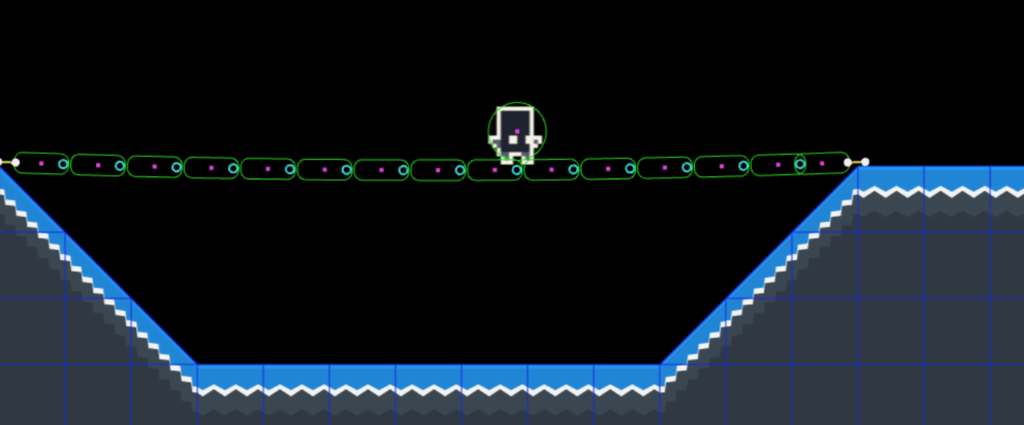
During this week I created the sliding blocks that we needed in the group project for the sliding block puzzle. I searched up how lerp functions work and found a site that put it as a simple equation: A + (B – A) * T (Unity, 2022), to make it more readable we’ll add an extra set of brackets and rename A, B and T: start + ((end – start) * time). This equation will return a position between the start point and end point based on the time value that goes between 0 and 1.
For example if start = 2, end = 4 and time = 0.5 then:
In this example time being half places our value at half showing that the equation works for the result we want. This equation works for three dimensional vectors which by then passing through a timer thats squashed down to the range of 0 to 1 we can create a smooth movement from a start point to an end point. Using this (and correctly squashing the incoming time variable) we can create a smooth movement like this:
Biblography:
Kindergarten. 2017. Windows [Game]. SmashGames
House. 2020. Windows [Game]. Bark Bark Games
JetBrains 2015. CLion (2022) [Software] [Accessed 11 April 2022].
CodeBind.com. 2018. How to Install OpenGL on Ubuntu Linux. [online] Available at: <http://www.codebind.com/linux-tutorials/install-opengl-ubuntu-linux/> [Accessed 14 April 2022].
Joey de Vries. 2014. LearnOpenGL [Online] Available at <https://learnopengl.com> [Accessed 25 March 2022]
Anton Gerdelan. 2016. Anton’s OpenGL 4 Tutorials [Online] Available at <https://antongerdelan.net/opengl/> [Accessed 23 March 2022]
Unity. 2022. Unity Documentation [Online] Available at <https://docs.unity3d.com/ScriptReference/Vector3.Lerp.html> [Accessed 3 May 2022]
Hello in this tutorial I will be showing you how to start on a platformer in phaser, I will supply the assets needed and you can download what we will be starting with here. You will also need an IDE (Integrated development environment) such as visual studio, visual studio code or rider
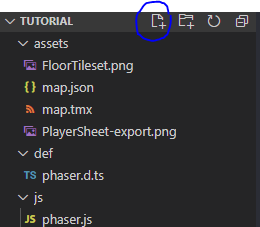
To begin we’ll need to create a file for the code to go into. Go into visual studio code (or your chosen IDE) and create a file under the js folder and name this “Scene.js”
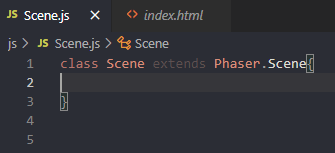
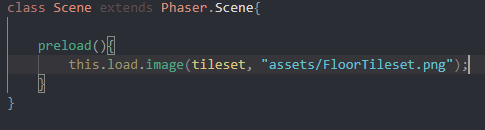
once this is created and you have a blank file like this we will need to set it up so that phaser can use it, we do this by adding text that tells phaser that its a class so write at the top “class Scene extends Phaser.Scene{ }” this defines it as a class and tells it to extend from Phaser,Scene which contains all of the functions that we’ll need to set up the scene to work.
To start off we’ll want to bring all of the assets in that we will need into the game, we’ll use one of the functions from the Phaser.Scene that we added called “preload(){}” inside of this we will need to tell the game to load the asset, the type of asset and where the asset is located. We’ll also need to tag the asset so that we can reference it when we want to use it. To do all of this we will need to write “this.load.image(tag, “assetlocation”);” the use of this specifies that we are writing in the scope of the class (in a way, as the class) then we say load and image this tells phaser that its an image coming in, we then give the tag and location of the asset. In practice it looks like this
Make sure tileset is in quotation marks as it is a string
In this example we are loading in the tileset that will be used a bit later on, you can see where I added the tag and the location which in this case we dont have to worry about the script being in a different folder from the assets as all of the scripts are run off of the index.html which is in the main folder so the path from there is just “assets/FloorTileset.png” and I used the tag tileset as this will be used as the tileset a bit later on.
The next thing we will need to add in this preload function is the player’s spritesheet. This spritesheet contains all of the frames for our player sprite, we’ll add this in a bit differently as this wont just be an image so instead we’ll use this.load.spritesheet, this requires the tag as usual but we’ll also have to tell it the dimensions of each frame and for this we’ll have an object inside of it. An object looks like this {}, everything in this is defined as a single object, this can be helpful for bunching together variables quickly for use in functions such as the one we are about to use.
Make sure the player part is in quotation marks, I had forgotten it here
As shown in the image we use an object to define the height and width of the animation frames from the player sprite sheet, we tag this as player and give the location as usual but the third input into the function is the object.
The next and last thing we’ll be adding to the preload is the tilemap json, the json contains the information about the tilemap thats included in the starting pack we’ll be using this in order to tell phaser how to handle the map and its tiles including its collision
Following the same format as the other, again check that its in quotation marks
this still follows the format of the previous load calls having a tag and location for the asset we’ll be using this in the next function where we will set up the players animations and the map itself I will be skimming over it and not explaining it as much as I’ve tried explained this
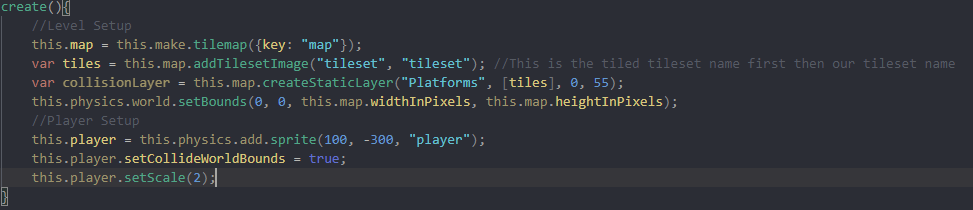
Starting off the function by writing create(){}
Right before we create the map here we will need to go up above preload and declare a few variables, variables declared before the functions are known as gloabal variables and can be used at any point in the file, we’ll need these variables to hold the information about our map, player and other things as we continue through the tutorial. The variables to write here for the timebeing are map and player, its better to keep variables starting with a lower case as to not confuse them with classes or functions elsewhere in the code
“Platforms” is supposed to be “Ground”
Here is the level setup and the player setup for the level we use the global variable map we made and a function to create the tilemap in the engine using the map that we defined in preload. The variable tiles on the next line is created only in create and is what we use to visualise the map, similarly with collisionLayer on the following line, its created only in create and is what we use to define the collision for the map, we’ll come back to this later. Next we setbounds for the world, this is to stop the player from falling out of the world. For the player we start by setting the global variable as a new physics sprite, we then set it able to collide with the world bounds and increase its scale a bit so that it’s easier to see
The last line we will add to create is this which creates the keys that we’ll need to control the character
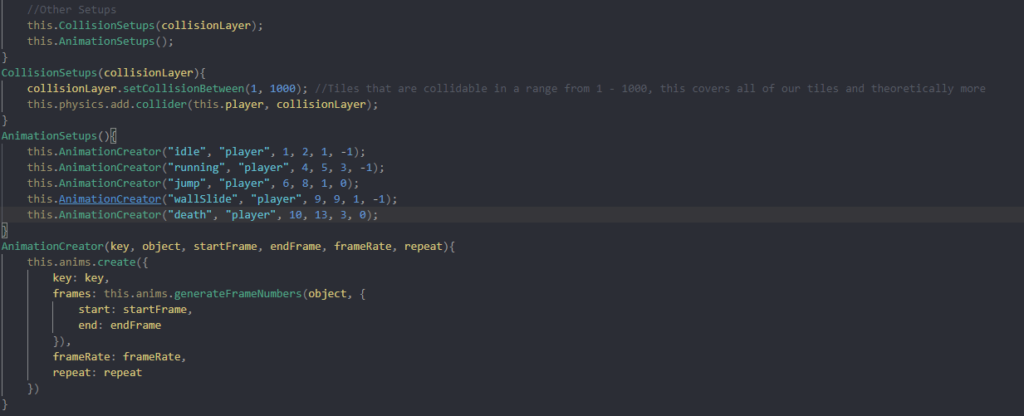
in the final bits of create we’re gonna write out 2 more functions to keep the code a bit neater by grouping together lines and 1 more that will streamline a function that we’d have to repeat otherwise.
The collision setups function takes our collision layer and tells it to count every tile as collidable, we set it to 1000 as it’ll make sure every tile is counted, we then tell the engine to add collision between the player and the collisionLayer. The animation setups function creates all of the animations we’ll need for the player using our third function animation creator. This function uses a seperate built in function this.anims.create and passes in the values into the object that we’d need to create ourselves otherwise, this helps organise the code as it means that we’ll only need to write out the full anims.create once and the rest can be done by figuring out the values we need such as the key, start and end frames, framerate etc
In the update function we will need to handle the players inputs using the keys we created in create (the cursors). We’ll first go through with seperate if statements to check if the player is pressing the key and then we will add velocity to the player if they are pressing left or right, 160 gives a good amount of speed to the player and whenever we are not pressing a direction the player will be still. The final if statement is for jumping that we will implement in a moment but the if statement checks that the player is touching the ground and then if they are it’ll set the players jump count to zero
it’s a good time to mention that you will need these two global variables in order for this system to work
Next we will add the bottom if statement, this will check that the players hit space and then check that the player has only jumped once (this usually ends up as twice due to the frame that the player presses space the character will still be touching the ground so the game resets the jump counter giving the player a second jump) and once it passes the check it sends the character up.
Using this as a starting area there is much more you could add to it such as wall jumping using a similar if statement to the ground detection and tweaking how it acts in response, you could add gliding using the keys and jump counter you could even add enemies by bringing the sprites in and having a timer control the movement instead of keys and using the collision setup to include a line where you specify collision between the players sprite and the enemies sprite, there are many places to go from here I’d suggest doing research on the phaser site and on forums to see what you want to try and create
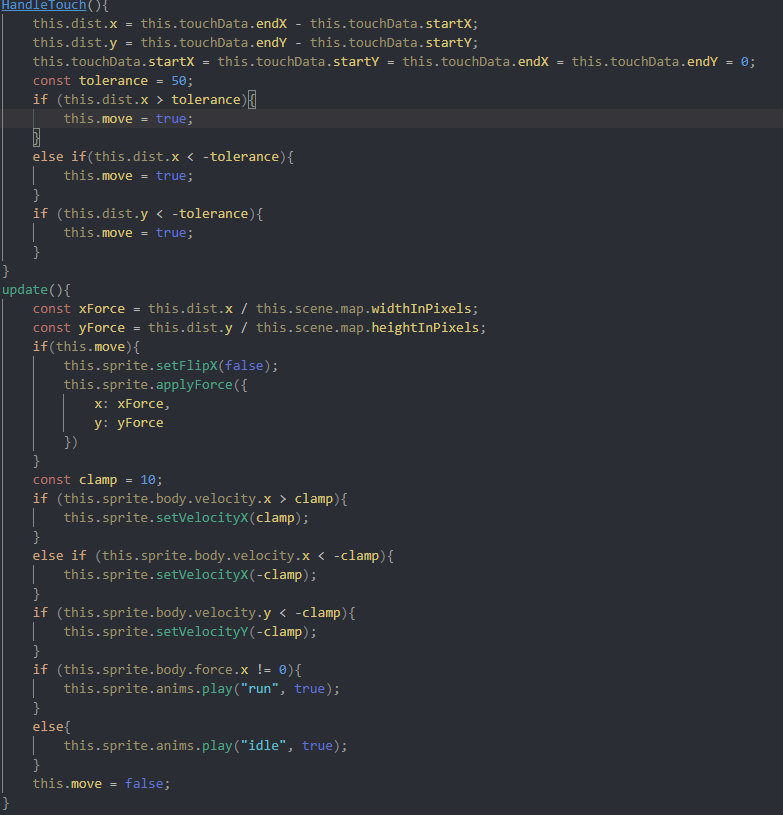
This week we needed to make a platformer but we had 2 big differences from how we usually make them. 1, we controlled it through dragging the pointer across the screen. 2, we made it using a different physics system called matter.
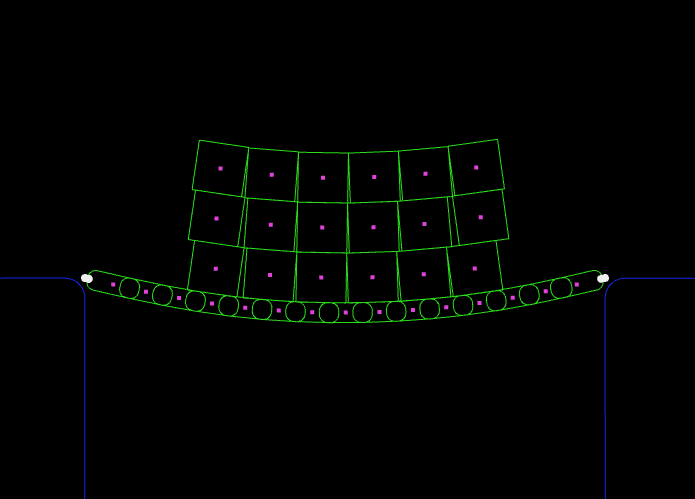
The matter system is much more complex than the arcade system we were using and it allows the creation of more complex shapes and systems such as bridges, cloth and ropes. In my customization I used bridges however I will get to this later.
We made a player character that used touch in order to move, the user would drag across the screen and the character would interpret this in one of 3 directions; up, left and right however I changed this in my customization where I made it so that whenever the player drags, where they drag to and how far they drag affects the players direction and speed (with a max speed of course). The amount they dragged was divided by the map’s width and height in order to shrink the speed down to something viewable and controllable otherwise the player clipped through the world bounds at the top of the screen
In my customization I had also added a bridge to the first level for the player to stand on
In order to create this bridge I used an example on the phaser website (Phaser 3, 2021). I modified the code to only the section that creates the bridge as I had no need for dragging the bridge with the mouse or having the two pillars the bridge connects to
Overall I found the matter physics engine more complex than the arcade but the complexity gave more control and ability to add more interesting things such as bridges and cloth
References:
Labs.phaser.io. 2021. Phaser 3. [online] Available at: <http://labs.phaser.io/view.html?src=src/physics/matterjs/bridge.js> [Accessed 25 January 2021].
This week we were asked to create a simple tank game in phaser including player and enemy tanks, movement, shooting, destructable walls. This project taught us how to use custom properties and texture atlases gave us a very simple enemy ai where they would move straight in a direction until they hit a wall where they would turn bounce off of it perpendicular to where they came from
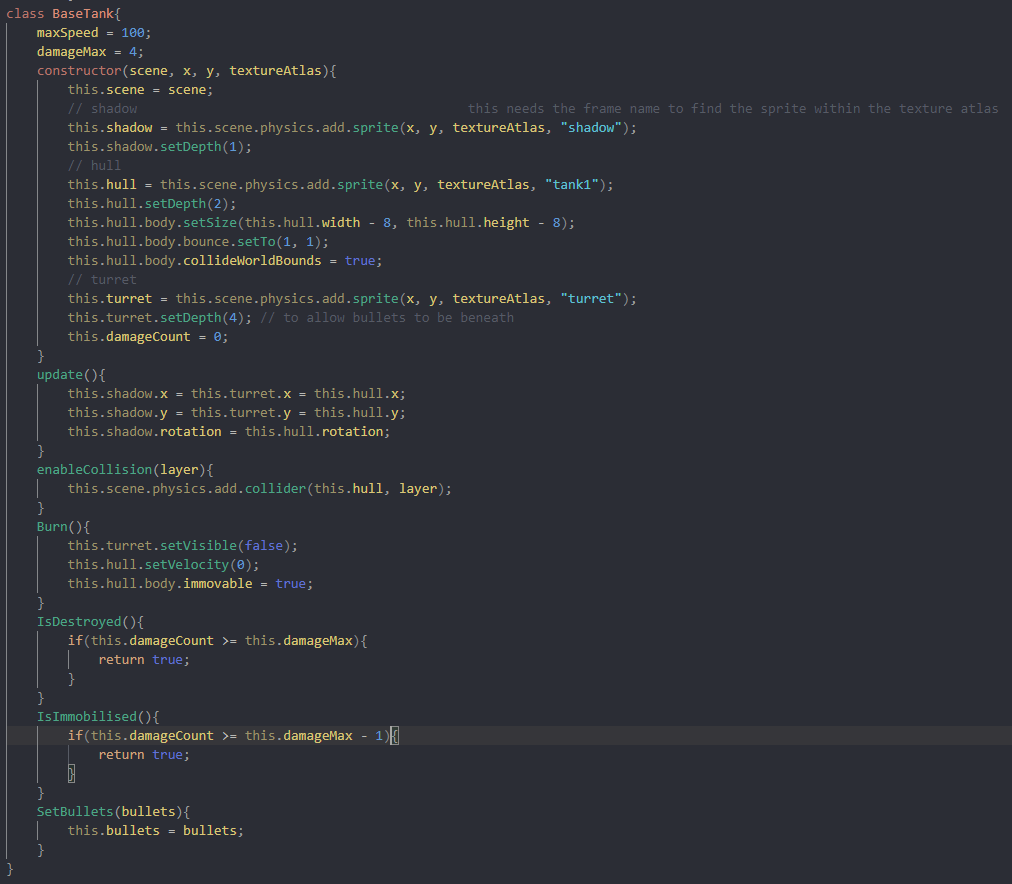
A big thing we learnt from this project was the implementation of classes and classes that extend from a base. During this project we needed to create a BaseTank class that would hold all of the functions and variables that would be needed to extend off of for the other classes. This was a big change from having all of our functions and variables inside of a singular file and this made it easier to find what we needed inside of it and made it easier to sort.
The basetank class needed a constructor in order to set it up, the tank is made up of three parts for it to work correctly, the turret for spawning the bullets, the hull for collision and movement and the shadow for nicer visuals. Inside of update these three need to be lined up correctly
for week 12 we were asked to create a simple platformer in phaser based off of the projects we had followed. We had to include; character animations, for this I had decided to create my own assets to have better control and to implement different mechanics, colliding and decoration layers in tiled, I had created more assets for the tilemap to make sure they fit the scale for the character animations I had created, spawn points for objects, the player and enemy paths using tiled’s object layer, multiple game scenes, intro and game over screens. There were stretch goals of which I completed the implement and extend a BaseScene class. Which made it so that I didnt have to copy over more code from scene A to scene B and taught me how to use baseScenes and the basics of seperate classes and static methods in said classes
I had created my own assets for this task in order to have more control over the project and be able to expand it in ways that i wouldnt be able to with premade assets (new animations)
My Sprite Sheet (white due to a lack of background for most of development)
this was the first spritesheet i’ve made, I kept the character simple by removing its connecting joints in a style like Rayman (Ubisoft 1995)
However I kept the characters for arms and knees in order to practice drawing said parts I had found drawing the connecting points to be difficult without more detail
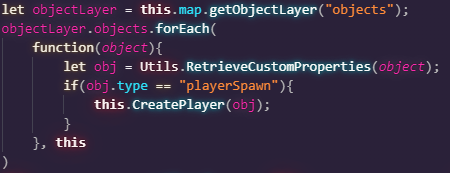
We had to use Tiled in order to create the map, I decided to make my own assets for it. We had to use an object layer for our game in order to spawn collectables and to set up enemies and their paths
the lines add variety to the ground blocks
Overall the project was a great comeback for 2021 giving me a chance to go over what I learned while also allowing me to learn some new things (tiled, multiple scenes, baseclasses)
We began the week by learning about the phaser game engine which is used to create 2d html games in javascript, it’s quite powerful however the setup process is a bit convoluted involving creating a config made of multiple layered objects inside the html index
We created a project in phaser, a little game where the player has to platform to collect stars and avoid bombs bouncing around the screen and platforms. This highlighted how to use sprites and collision groups which work differently to how im used to (unity which all colliders interact with each other unless specified) where you have to specify what other collider groups it can interact with
Week 11/01/21
The object layer in Phaser is much more powerful than I had thought although it works very differently to the tile layers where you only create data points for the code to reference as opposed to adding assets and laying out the level.
Over the christmas break we were tasked with creating a basic 2D platformer in phaser using what we learned, I used this opportunity to improve on my sprite creation skills by making all of the assets I used myself
sorry for the white colour this was to test the animations while the background was still the default black and I found it worked better in game so I kept it
This is the player sprite sheet I made, the first image is the character in a T pose, this was to have a reference for the dimensions of the sprites, the second through to fourth is the idle animation for the player, the fifth and sixth animation is running, I used a different shade to colour the limbs that would be (in a higher frame count animation) moving behind the player, this creates a (mild) illusion of movement to the user and is more dynamic than a singular frame, the seventh to ninth animation frames are a jump animation, I had run into a problem with it actually where there is only one situation where the jump code runs due to the movement animations taking priority over it, the only time it runs is when the player dies and tries to jump (now fixed), the tenth animation frame is the wallslide frame, the offset on this makes it always stick to the wall left walls work thanks to the flipX method, and the eleventh to fourteenth frames are the death animation which start with the t pose and have the characters limbs collapse followed by its torso and head, I decided to style the death animation this way as I felt it made sense due to the characters lack of connection between limbs and torso.
For this weeks task we had to create a tank game following a pre recorded lecture. In this we used static functions in a class called Utils, I’ve had minimal experience with static functions before but hadn’t found them that useful but after this I get how they can be much easier to use over having to create a new instance of the class whenever you need to access the functions.
Here we use one of the static functions in order to get the custom properties that we gave tiles in tiledThe RetrieveCustomProperties function in the Utils Class
Reflect
This project allowed me to try out new things and learn programs that I’ve never used before (Tiled, Aseprite) along with creating assets that I’ve never made before such as a spritesheet and tileset
We had to customize the phaser project we began with (the one with bombs and stars) and change the assets used in order to make it more unique, for me I edited the assets directly to style the platforms differently and change the stars into a different object (apples) from this i found a space background online because I find space to be an appealing backdrop which gives more grandness to the game and to fit with the apples being the collectable I changed the bombs into doctors which are trying to stop you from eating apples
The gameplay i tweak slightly starting with changing the bouncing of the doctors (lose condition) so that its speed will increase or decrease slightly with eat bounce, this added a layer of unpredictability that makes the player have to react faster to the doctors bounce and trajectory. I also made it so that after 5 apples are collected a new doctor is spawned this means that the player will quickly have more obstacles to avoid which will add more challenge and close tense moments
Today I fixed the bullets as the speed variable was being defined incorrectly and I then implemented enemy death, I first tried to use a splice in the array to delete the enemy when this didn’t work I added an active state and had the enemy update only when it was active but this has lead to another issue with the enemies collider staying back when the enemy dies, so far I have tried to set the collider to a trigger once the enemy dies so that objects can move past the inactive enemy. This has worked for the enemies but the player still bumps into these inactive objects.
Today I fixed the enemies having active colliders after death and also made it so that the dead enemies respawn, I did this by changing the parameters for the enemy check where before it would check that the array length was below the max enemies (10) now it just checks that the array contains null or inactive enemies. As for the collider issue I’ve fixed it by adding active states to every object and having the collider make sure that the objects are active before performing the functions. I have also made the bullets become inactive on enemy hit, this is so that the enemies require more than 1 hit to defeat and so that the bullets don’t pierce through every enemy. I accomplished this by having the collider check the tags of the objects and making the bullet inactive. Currently the bullet has minor collision, this can lead to the player getting pushed or sometimes stopped for a moment by the bullet, if the player fires the bullet to their left then the bullet pushes them right for a moment after it spawns
A little later I created a system to limit the framerate based on code from JsFiddle(Http://jsfiddlenet/m1erickson/CtsY3/). I used this because many issues were arising from seconds passing to fast and movement issues, now I can set the target framerate easily and base certain variables around that.
References: Jsfiddle. [no date]. Http://jsfiddlenet/m1erickson/CtsY3/. [Online]. [9 November 2020]. Available from: http://jsfiddle.net/m1erickson/CtsY3/