14/03/22: This week we were set into groups to create a game jam style game prototype in around a week which we would then be expanding upon for around six weeks, this game needs to fit the theme “a conversation that changes the world” our game through the conception stage became a game about two stoners that try to remember the day before and how it ended in the apocalypse, the hazy memory of the stoners is used to drastically change the narrative based on the players choice. The game was inspired by Kindergarten (SmashGames, 2017) and House (Bark Bark Games, 2020). The project is a 2D isometric pick your path down a narrative puzzle game.
21/03/22: During the meeting to discuss game progress between the teams our group was told that the characters could not be stoners directly due to problems with target demographics. We started working on the game project itself, I created a pickup base class which worked by calling a function whenever the player pressed space that would add itself to an inventory that the player has so that they can cycle through the items they have, this should work well with puzzles that have the player take items that they find previously and use them to fit certain conditions to progress
28/03/22: On top of having a group project to be giving attention to we have also been tasked with writing a Report proposal for a report that we will do in the third year. We choose a topic to delve further into such as AI or VR. I’m curious about doing something such as making my own engine though that would be too big a task for the short time we’re given to accomplish it. I will do research on OpenGL which is a rendering API (Application Programming Interface) (Basically a library) that I can use to create a basic renderer. OpenGL has been used in many games as an alternative way to render, usually for compatibility as it works with more computers than DirectX (linux doesnt support DirectX directly)
04/04/22: After giving the project more thought and doing some research on OpenGL I have decided to create a simple renderer for my task, currently I do not have a more specific goal than to follow some sources to create a renderer though i do not yet know what I will use it for. My primary source of information in setting up the renderer will be from: https://learnopengl.com/ which is a large tutorial, written in C++, that explains how OpenGL and rendering works. I will be coding the program in C as it is a language I would like to learn as well as being the language used to create OpenGL. It’s used as the base for C++ so it shares a lot in common, the biggest difference being that a lot of functionality introduced in C++ (classes is an example) isn’t present in C so if the tutorial uses anything like that I will have to find a way around it
During this week I also redeveloped the interaction system for the group project as the current version was unusable in C++ and I don’t know blueprint well enough to contribute with it, so I replicated the way the original interaction system worked (calling to whatever object you were standing in the trigger for). This system was indistinguishable but meant that I could create interaction objects in C++ in the future. One bug that I took a bit to fix was that the trigger’s visual effect wouldnt be attached to the trigger object but changing the object from static to movable had seemingly fixed it
11/04/22: I went about setting up a way to follow along with sources and get started on creating a renderer in C, I decided to use CLion (JetBrains, 2015) as we have a student license for it however when downloading it I made a big mistake, I use Linux as my operating system which comes with an appstore of sorts which has CLion available to download but what I didn’t realise until later is that the download is in the form of a flatpak which is a way of packaging applications but flatpak keeps the application inside of its own environment. This is great for security but not for an IDE (Integrated Development Environment) which needs access to the root filesystem to get libraries to compile with, It took me a long time to realise this was the case but I kept getting errors about the compiler being unable to find the libraries that are supposed to be included with my operating system. Once I knew that this was the issue I instead downloaded it from the site which worked much better as I could now compile the code I was using to test the OpenGL setup I had:

This code borrowed from
http://www.codebind.com/linux-tutorials/install-opengl-ubuntu-linux/
creates a window called hello world that renders a right angle triangle on screen, I used it to make sure my CMake file was set up correctly. a CMake is used as instructions for the compiler so for example it contains all of the names and paths to the files needed for the build such as library files or header files
18/04/22: Following a tutorial found here: https://antongerdelan.net/opengl/ I sought out to set up OpenGL and use it for my technical report. I used CLion for this project
I’ve run into issues with libraries and I’ve needed to find them in my operating systems files (Linux Pop OS)
Needs to find out more about library links and the CMake file
Taking the example code shown in Functional Example found at: http://www.codebind.com/linux-tutorials/install-opengl-ubuntu-linux/. I was able to get a triangle to appear on screen, tweaking the x y z allowed me to manipulate the triangle, the x y z lines generate the shape by placing vertexes onto the screen which opengl then connects together, these vertexes are read counter clockwise so its important to keep that in mind when creating vertexes
https://learnopengl.com/Getting-started/: massively helpful, main source of information setting up opengl
Setting up an OpenGL window
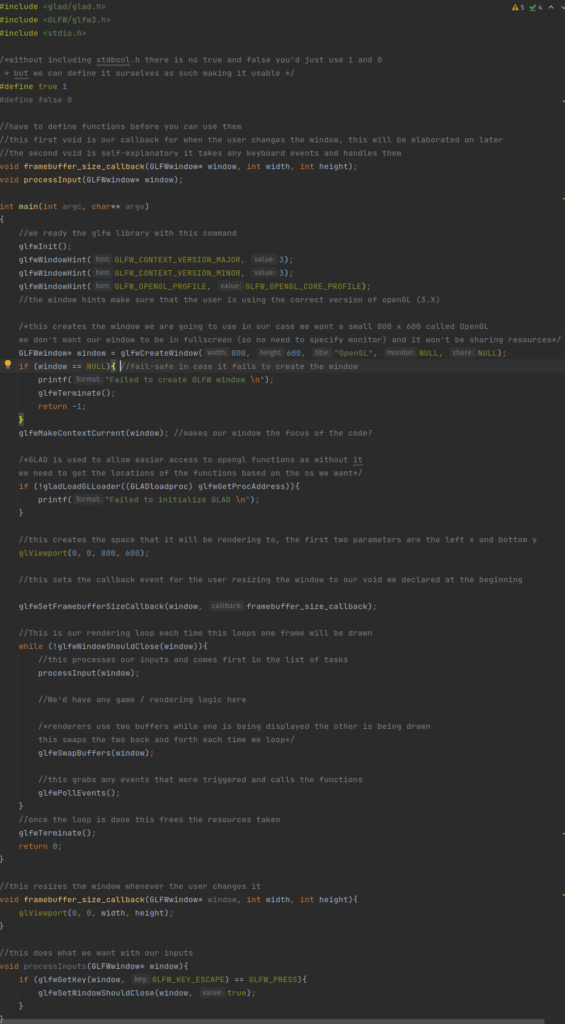
Main Takeaway – C is very barebones even booleans arent included by default.
Libraries give enormous amounts of functionality like opengl trivialising large tasks such as creating a window or polling for keyboard inputs
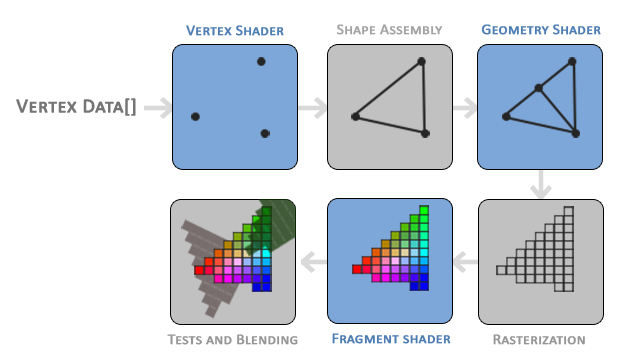
25/04/22: In order to render a triangle I will need to understand how rendering is done through opengl, though this does apply to rendering in general. The first stage takes all of the vertices from the vertex data which gives a list of three 3D coordinates that form a triangle. The next stage takes the vertices and turns them into primitive shapes (the shapes need to be specified through hints given to the vertices). Once the primitive assembly is done its output is given to the geometry shader which generates the more complex shapes from the primitives by adding new vertices. Afterwards its moved into rasterization stage where the shapes are mapped to the pixels on the screen turning them into fragments for the next stage, before it reaches that however it removes any fragments that arent visible. The fragment shader calculates the final colours of the pixels usually the effects are applied in this stage as the fragment shader can contain the lighting and shadow data. There is a
final stage that checks depth and alpha values in order to blend objects together if needs be. In OpenGL we have to create a vertex and fragment shader as there isnt a default one on the GPU so I’ll have to learn more about rendering to do even seemingly simple things like rendering triangles
Rendering has many stages to it from the points of the shapes to the colouring and blending of points
02/05/22:
During this week I created the sliding blocks that we needed in the group project for the sliding block puzzle. I searched up how lerp functions work and found a site that put it as a simple equation: A + (B – A) * T (Unity, 2022), to make it more readable we’ll add an extra set of brackets and rename A, B and T: start + ((end – start) * time). This equation will return a position between the start point and end point based on the time value that goes between 0 and 1.
For example if start = 2, end = 4 and time = 0.5 then:
2 + ((4 – 2) * 0.5) Becomes-> 2 + (2 * 0.5) Which becomes-> 2 + 1 = 3.
In this example time being half places our value at half showing that the equation works for the result we want. This equation works for three dimensional vectors which by then passing through a timer thats squashed down to the range of 0 to 1 we can create a smooth movement from a start point to an end point. Using this (and correctly squashing the incoming time variable) we can create a smooth movement like this:
Biblography:
Kindergarten. 2017. Windows [Game]. SmashGames
House. 2020. Windows [Game]. Bark Bark Games
JetBrains 2015. CLion (2022) [Software] [Accessed 11 April 2022].
CodeBind.com. 2018. How to Install OpenGL on Ubuntu Linux. [online] Available at: <http://www.codebind.com/linux-tutorials/install-opengl-ubuntu-linux/> [Accessed 14 April 2022].
Joey de Vries. 2014. LearnOpenGL [Online] Available at <https://learnopengl.com> [Accessed 25 March 2022]
Anton Gerdelan. 2016. Anton’s OpenGL 4 Tutorials [Online] Available at <https://antongerdelan.net/opengl/> [Accessed 23 March 2022]
Unity. 2022. Unity Documentation [Online] Available at <https://docs.unity3d.com/ScriptReference/Vector3.Lerp.html> [Accessed 3 May 2022]